

In this article, I will explain how to build a movable background Image without any use of a third party library. This is different from creating an animated slide show or carousel.
Prerequisite
In this tutorial, you will need basic knowledge of:
- HTML
- CSS
- JavaScript
Lets start by creating the files in the terminal:
mkdir movable-background
cd movable-background
touch index.html styles.css scripts.js
Note: You can give it whatever name you want.
HTML
We then write our HTML5 boilerplate linking our CSS and JS files. By convention we will name it index.html.
<!DOCTYPE html>
<html lang="en">
<head>
<meta charset="UTF-8">
<meta http-equiv="X-UA-Compatible" content="IE=edge">
<meta name="viewport" content="width=device-width, initial-scale=1.0">
<title>Document</title>
<link rel="stylesheet" href="./style.css" />
</head>
<body>

    <script src="./script.js"></script>
</body>
</html>
We then write in the following markup.
<div class="main-container" id="main-container">
<div class="cake-container" id="cake-container">
<div class="cake-mover" id="cake-mover"></div>
</div>
<div class="content">
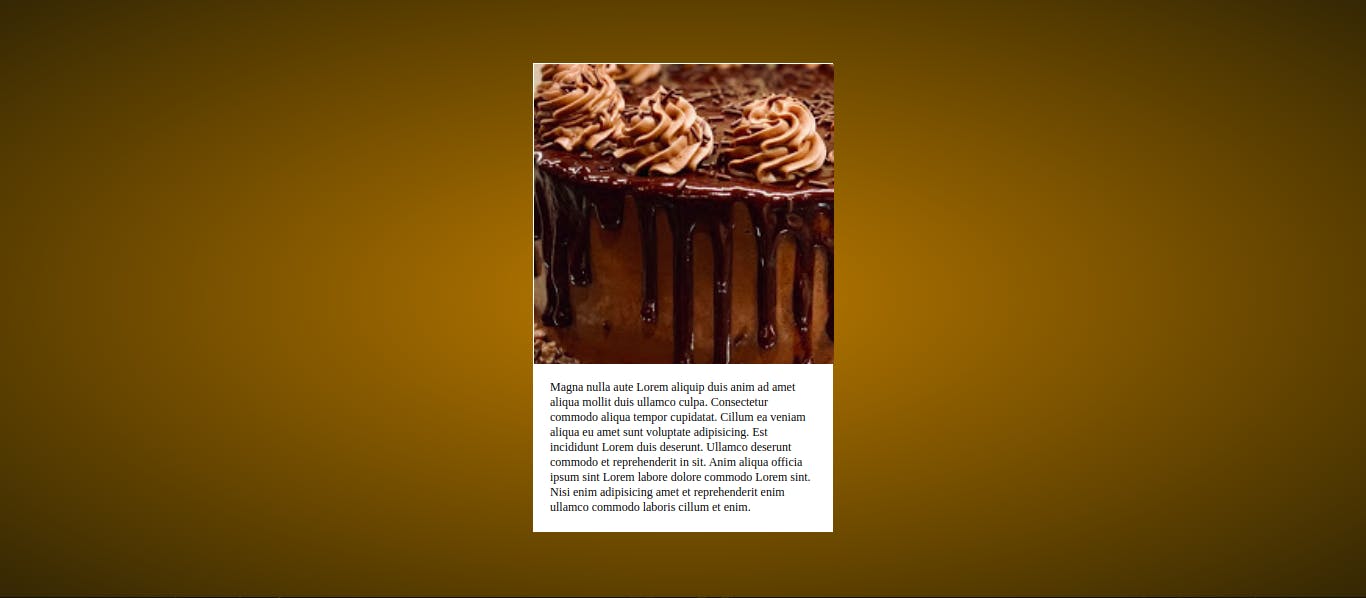
Magna nulla aute Lorem aliquip duis anim ad amet aliqua mollit duis ullamco culpa. Consectetur commodo aliqua tempor cupidatat. Cillum ea veniam aliqua eu amet sunt voluptate adipisicing. Est incididunt Lorem duis deserunt. Ullamco deserunt commodo et reprehenderit in sit. Anim aliqua officia ipsum sint Lorem labore dolore commodo Lorem sint. Nisi enim adipisicing amet et reprehenderit enim ullamco commodo laboris cillum et enim.
</div>
</div>
From the above markup, we input a <div> element giving it a class name and id main-container. This acts as the parent container for the module. Inside the main-container element, we create two child <div> elements; one having a class name and id cake-container (We are using a cake photo for this exercise) which also have a child <div> element with class name and id cake-mover. The cake-mover will contain the background photo.
The other <div> element for the main-container simply contains a paragraph for the photo and has a class name paragraph.
At the end your index.html file should look like this;
<!DOCTYPE html>
<html lang="en">
<head>
<meta charset="UTF-8">
<meta http-equiv="X-UA-Compatible" content="IE=edge">
<meta name="viewport" content="width=device-width, initial-scale=1.0">
<title>Document</title>
<link rel="stylesheet" href="./style.css" />
</head>
<body>
    <div class="main-container" id="main-container">
      <div class="cake-container" id="cake-container">
          <div class="cake-mover" id="cake-mover"></div>
        </div>
        <div class="interlude">
            Magna nulla aute Lorem aliquip duis anim ad amet aliqua mollit duis ullamco culpa. Consectetur      commodo aliqua tempor cupidatat. Cillum ea veniam aliqua eu amet sunt voluptate adipisicing.     Est incididunt Lorem duis deserunt. Ullamco deserunt commodo et reprehenderit in sit. Anim     aliqua officia ipsum sint Lorem labore dolore commodo Lorem sint. Nisi enim adipisicing amet et     reprehenderit enim ullamco commodo laboris cillum et enim.
       </div>
     </div>

<script src="./script.js"></script>
</body>
</html>
CSS
Lets import our font and reset all items.
@import url('https://fonts.googleapis.com/css2?family=Sacramento&display=swap');


* {
  padding: 0;
  margin: 0;
  box-sizing: border-box;
}
The box-sizing: border-box property includes padding and border values into an element’s total width and height, so it’s easier to calculate its dimensions.
body {
  display: flex;
  justify-content: center;
  align-items: center;
  background: radial-gradient(
    rgb(182, 120, 28),
    rgb(51, 37, 7)
  );
  height: 100vh;
  margin: 0;
}

.main-container {
  width: 300px;
  border: 1px solid white;
}
By combining the properties display: flex, justify-content: center, align-items: center in the body, it’s possible to center the child element .main-container both vertically and horizontally. The background is then given a nice radial-gradient color and also height: 100vh that constrains the body to the height of the viewport.
.cake-container {
display: block;
width: 300px;
height: 300px;
}

.cake-mover {
width: 300px;
height: 300px;
background: url(./cake.jpg);
background-size: 800px;
background-repeat: no-repeat;
background-position: center;
transform: scale(1);
}
.paragraph {
background: white;
padding: 1rem;
font: 12px "Sacremento";
}
The .cake-mover element is given width and height of 300px. The background: url() contains the path to the photo being used for the exercise, in this case ./cake.jpg in order to set a nice background position, other background related properties we add background-size: 800px, background-repeat: no-repeat, background-position: center to it.
The .paragraph element is given a white background, a padding (space between the margin and the content) 1rem, font size of 12px and font-family sacramento (our imported font).
At the end, we have the image below display on your browser.
JavaScript
Now to make this exercise fun, we will create the animation using javascript:
var container = document.querySelector("#cake-container");
var mover = document.querySelector("#cake-mover");
We fetch the HTML elements with id’s cake-container and cake-mover and assign them to the variables container and mover respectively using the DOM querySelector( ) method.
Note: The querySelector() method only returns the first element that matches the specified selectors. To return all the matches, use the querySelectorAll() method instead.
container.addEventListener("mousemove", function(e) {
mover.style.backgroundPositionX = -e.offsetX * 1.8 + "px";
mover.style.backgroundPositionY = -e.offsetY + 80 + "px";
});
We then pass the mousemove event listener on the container variable to help detect when the user move over the element. The function adjusts the style background positions (X and Y) of the mover variable by setting the offsetX and offsetY of the event. With offsetX we will get the height of the backgroundPositionX, measured in pixels. The offsetY tells us the width of the backgroundPositionY, measured in pixels.
Conclusion
In this tutorial, we have learnt about building movable background using vanilla CSS and JavaScript. With this knowledge, we can also move objects on the webpage, which gives your website a nice animated feature.
If you find this article helpful, kindly leave a like ❤️
Thanks for reading. 👋